Using the Merchant Management System (MMS)
We've answered a list of questions you might have about using your MMS so you can get the most out of your online payment solutions.
How do I log in to the Merchant Management System?
To log in to the merchant management system you just need your username and password (this will have been emailed to you on the creation of your user account).
Then head over to https://mms.tponlinepayments2.com/Login.aspx and enter your username and password.
If this is the first time you’ve logged in, the link to this website will be provided in your welcome email, and you will be required to complete your own password and security question/answer.
How do I reset my password?
To reset your password, click the ‘forgot password’ link on the login screen, which is https://mms.tponlinepayments2.com/Login.aspx and you will be asked to enter your username.
As soon as you’ve done this, you will need to answer your security question which you set on the first login.
Once you’ve answered this correctly you will be sent a new temporary password, with which you can log in and set yourself a new password.
Alternatively, if you are not the owner/a named person on the business, you can ask the super user of the account to provide the password reset email.
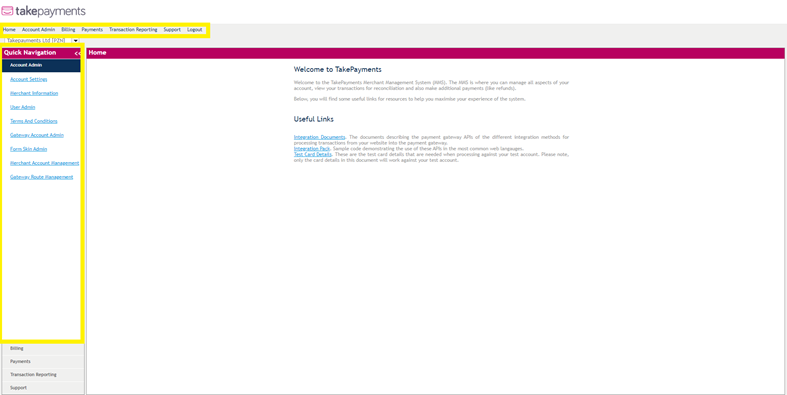
How do I navigate the Merchant Management System?
Navigating the Merchant Management System (MMS) is easy.
There are two ways you can do it, either using the menu bar across the top or using the options along the side (highlighted below).
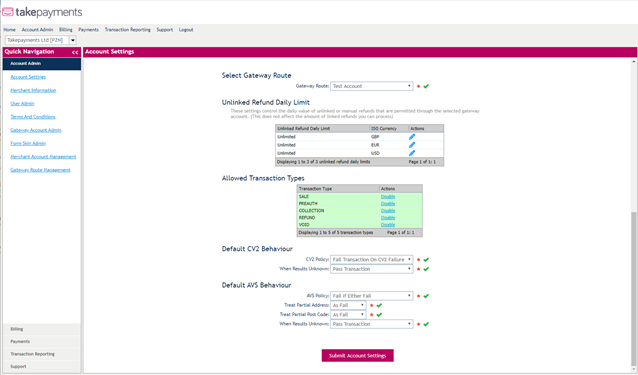
How do I control my account settings?
The Account Settings page lets you control the outcome of future transactions when certain security features fail, or are not present.
By default, the security settings are set to the strictest possible, if you need to relax any of the security settings this should only be done by you, the merchant.
- CV2 refers to the last three digits on the back of debit and credit cards, for American Express cards it is the 4 digits on the front.
- AVS stands for Address Verification System.
How do I enter my merchant information?
The Merchant Information page shows all the basic information about your business. When logging into your account for the first time, we recommend that you add in your details so we can contact you if we need to.
If you yourself aren’t the technical person within your business, for example, if you use a website developer to manage your website, you can add their contact details here too.
Please make sure all information on this page is kept up to date so that you receive the latest information when we send it out.

How do I find my merchant ID and password?
If you can’t locate your username, please email us at online@takepayments.com or call us on 01606 566 600 and we will be able to provide you with this after you’ve answered some security details.
Alternatively, if you are not the owner/a named person on the business, you can ask the super user of the account to provide this to you.
How do I set up users?
You can add new users through the User Admin page. You can also edit existing users here too.
Each user within your business who requires access to the MMS will need to have their own login. This is for the security of your account.
In the toolbar section, there is a row of icons (see below). We’ll describe what they all mean below too.
To perform an action you will need to select a user from the user administration panel and click on one of the icons.

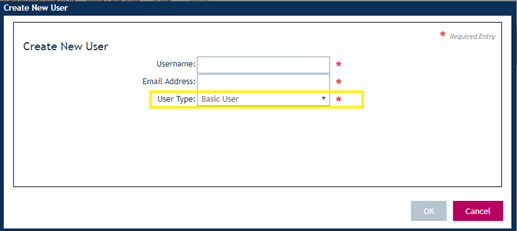
Add New – This lets you create a new user. You will be prompted to create a unique username and enter a valid email address.
Edit User - This lets you change the user type and permission levels of an existing user.
Delete User – If someone leaves your business, this lets you delete them from the MMS system. If they have active transactions in the system, rather than deleting immediately, their status will change to ’pending delete’ until these transactions have expired.
Reset User Password - A merchant super user can reset the password of a user's account. An email will be sent to the user with a temporary password, which they will then be asked to change when they next log in. If a super user is locked out and unable to reset the password from the login page, please contact takepayments and we’ll be able to get you back in.
Reset User Secret Question- If the user is unable to reset their password, they’ll be asked to answer a secret question, which they’ll have set up when registering. The merchant super user can reset this if the user can’t remember the answer. When the user attempts to log in using the temporary password provided, they will be able to create a new secret question.
Resend Confirmation Email- If the user has not confirmed their email address, the merchant super user can resend the confirmation email.
How do I set up different permissions for different users?
You will need to set specific user rights for each new user. Below is a description of the five different user rights.
Developer - Can access the system and download the technical documentation for integration purposes and run test payments using the test card details explained in section 5.
Merchant Administrator - Can run all payment types including sale/pre-auth/refund, create/edit PayByLink, create/edit scheduled transactions, unlinked refunds, voids, view transaction history, and summary pages.
Basic User- Can perform the same actions as the merchant administrator but cannot action a refund, unlinked refund, or void.
Restricted Basic User - Can perform the same actions as the basic user but cannot create/edit scheduled transactions.
Merchant Viewer - This will only allow the user to view transactions.
Merchant Super User- Merchant Super Users are only able to be added/edited by Payzone. In order to change the information for a super user you will need to contact a member of our team.
How do I change permissions for existing users?
You can edit all types of users, with the exception of Merchant Super Users (please call us to amend Super User details on 01606 566 600).
To edit an existing user, select the one you want to edit from the user administration panel and click Edit.
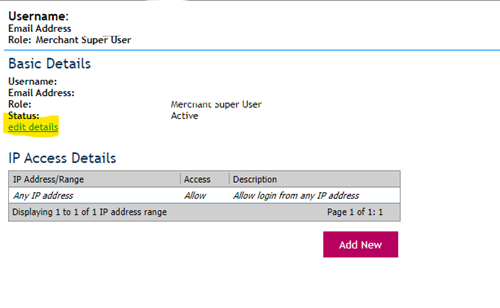
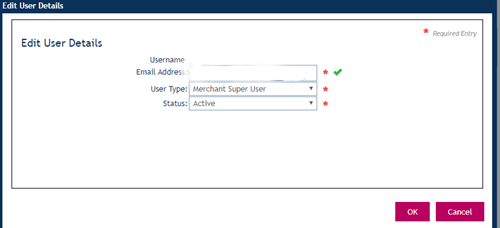
Amend User Type - If you want to change the permission rights for one of your existing users, there is a drop down box which will allow you to select the relevant user rights.
Amend User Status - Here you can check and amend the status of your users. If users within your organisation get locked out of their account, the status will show as ‘Locked’. Select ‘Active’ from the drop down box to unlock the account.
You can also disable accounts by selecting ‘Disabled’ from the drop down box.
How do I implement user IP address security?
By clicking User Admin the merchant super user can specify an IP address for a particular user. If that user attempts to log in to the MMS from a location other than the assigned IP address they will be denied access to the system.
You can find the IP address by visiting https://www.myip.com/. If you are using a VPN or other private network please speak to your IT support who will be able to get you the public IP to use to allow access.
This functionality cannot be set for a Merchant Super User and can only be set after a user has become active and has logged in for the first time.
How do I process a transaction?
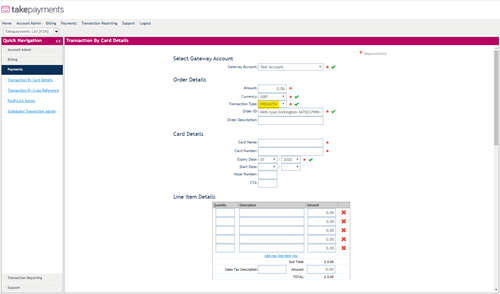
You can process a transaction by clicking on the Payments tab within the Merchant Management System and then selecting Transaction by Card Details.
![]()
A payment page will appear which you need to fill out with all information required to process a transaction. Make sure all the sections with ‘*’ are filled in or the payment won’t process.
![]()
In the box ‘transaction type’ you will see there is a drop-down box that states SALE, PREAUTH, and REFUND, make sure you select ‘SALE’ when processing a transaction.
Once all the details are entered for your transaction you need to then click the ‘Submit for Processing’ button.
If all the details are correct and the payment is successful you will see a successful confirmation message appear.
![]()
To access a receipt of the transaction click on ‘View Receipt’ at the bottom of the response message. Here you will have the option to print the receipt if needed.
How do I run a preauthorisation?
You can run a preauthorisation by clicking on the Payments tab within the Merchant Management System and then selecting Transaction by Card Details.
A payment page will appear which you need to fill out with all information required to process a transaction. Make sure all the sections with ‘*’ are filled in or the payment won’t process.
In the box ‘transaction type’ you will see there is a drop down box which states SALE, PREAUTH and REFUND, make sure you select ‘PREAUTH’ when processing a transaction.
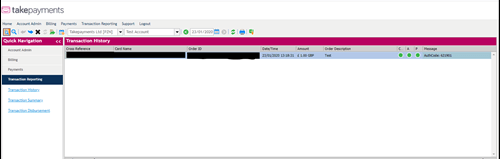
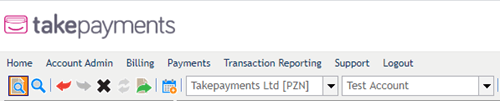
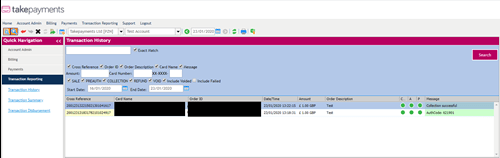
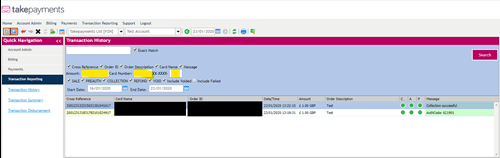
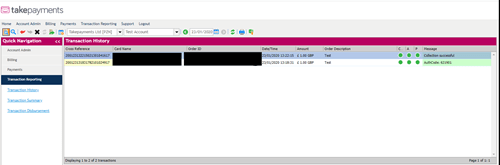
To collect the selected preauth transaction you need to find the original pre-authorisation made within your transaction history as seen below. If more than one transaction has been made that day make sure you select the correct transaction:
Once you have selected the pre-authorisation transaction within the transaction history to collect this you need to select the ‘collect the selected preauth transaction’ Icon ![]() which is on the main tool bar.
which is on the main tool bar.
A pre-authorisation can be held for five working days, if you haven’t collected the preauth within these five working days the money will be released back into your customer’s bank.
How do I process a refund or void a transaction?
You can issue a refund in the ‘Transaction History’ section.
Select Transaction for Refund - Using the menu bar across the top of the page select ‘Transaction Reporting’ and then click ‘Transaction History’ from the drop down box. Select the transaction that you wish to refund.
Refund Details - Click the Refund Icon on the toolbar to open the refund page. See the example screenshot below.
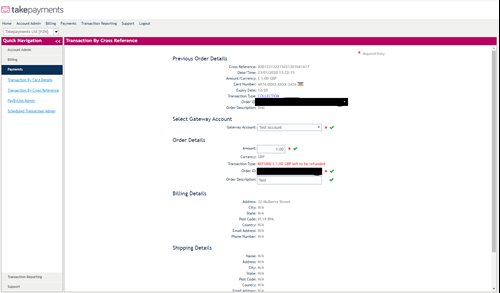
Submit - Press the 'Submit For Processing' button when you are ready to pay the refund. You should then see a response message confirming the successful refund. Click 'Return to Transaction History' to navigate back to transaction history.
You can void a transaction by clicking the icon 'X' on the main toolbar once you have selected the transaction made in the transaction history. You can only void a transaction on the same day the original transaction initially occurred. If it has been over a day since the transaction was made you will have to run a refund.
How do I protect against fraud using a Virtual Terminal for telephone or mail order sales?
Mail Order or Telephone (MOTO) sales have the highest risk of card not present sale a merchant will undertake.
This is due to both the card not being present to be checked or authenticated by a secure method such as Chip & Pin or a similar online method such as 3D secure which only works for online pay pages.
Fraudsters will often use the MOTO sales channel to attempt to defraud merchants.
To protect themselves, merchants have several tools available to them:
- AVS – Address Verification Service, a solution that checks the billing address to the cardholder details
- CVV or CV2 – the 3-digit card security number
What else can you do?
Beyond the standard methods of card protection there are several actions a merchant can take:
- Is the order non-typically high?
- Does the delivery address match the card address, if not, is the reason reasonably believable and not (1)?
- Does the area code of the telephone number calling match the delivery destination?
- If 1, 2, or 3 are the case, and as a further check, the merchant could call the prospective consumer
- Pull up Google street map
- Seek to ask the “consumer” to confirm landmarks in the vicinity of their billable card e.g. nearby churches, pubs, etc (this will give added confidence that the cardholder is who they say they are)
- Seek to ask the “consumer” to confirm landmarks in the vicinity of the delivery destination
How do I report on my transactions?
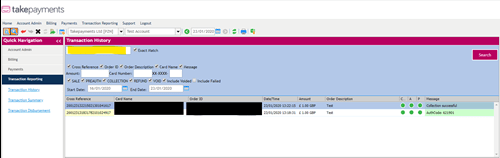
On the Transaction History page, you will find a list of transactions by day. If a search has not been initiated this page will show the existing days' transactions with the most recent transactions listed at the top of the page.
The Transaction Toolbar
Display Details Icon![]() This icon hides or displays the transaction details panel. This panel can be found below the list of transactions at the bottom of the screen and provides transaction information.
This icon hides or displays the transaction details panel. This panel can be found below the list of transactions at the bottom of the screen and provides transaction information.
Search Icon![]() This icon will hide or show the search panel. If you wants to find a particular transaction click this icon to perform a search. This function is covered in greater detail in Section 7.1.
This icon will hide or show the search panel. If you wants to find a particular transaction click this icon to perform a search. This function is covered in greater detail in Section 7.1.
Refund Icon![]() This icon will open the refund page. This function is covered in greater detail in Section 7.2.
This icon will open the refund page. This function is covered in greater detail in Section 7.2.
Collect The Selected Pre-Authorisation Transaction![]() If you have run a pre-authorisation against a card, this icon will allow you to collect a transaction that has been pre-authorised. In the ‘transaction type’ field simply select ‘PREAUTH’ instead of ‘SALE’.
If you have run a pre-authorisation against a card, this icon will allow you to collect a transaction that has been pre-authorised. In the ‘transaction type’ field simply select ‘PREAUTH’ instead of ‘SALE’.
Void The Selected Transaction![]() You can void a transaction by using this icon. You can only void a transaction on the same day the transaction initially occurred. Transactions can only be voided on the same calendar day as they were originally processed.
You can void a transaction by using this icon. You can only void a transaction on the same day the transaction initially occurred. Transactions can only be voided on the same calendar day as they were originally processed.
Retry Failed Transaction![]() Clicking this icon will retry a previously failed transaction.
Clicking this icon will retry a previously failed transaction.
Re-Use The Selected Transaction Details To Run A New Transaction![]() Clicking this icon will re-use the existing card details to run a new transaction. This eliminates the need to re-enter already submitted card details.
Clicking this icon will re-use the existing card details to run a new transaction. This eliminates the need to re-enter already submitted card details.
How do I use the search functionality?
The search function within ‘Transaction History’ allows you to look up past transactions using a variety of different search fields.
To Search
Click on Search ![]() to hide or show the search panel. If you want to find a particular transaction, use this icon. It can be found in the panel below.
to hide or show the search panel. If you want to find a particular transaction, use this icon. It can be found in the panel below.
Search Panel
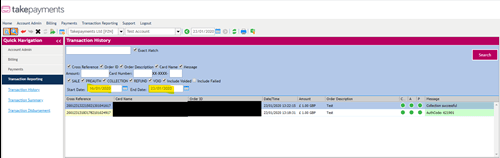
To search for a particular transaction you can use the fields within the Search Panel. Please note that the Date Range needs to be filled in, all other fields are optional.
Keyword Search
Use the box highlighted in yellow to search by keyword e.g. Name or Order ID.
Exact Match
With the Exact Match box ticked you can search by Cross Reference, Order ID, Order Description and Card Name.
If you un-tick the Exact Match box you can search by Cross Reference OR Order ID OR Order Description OR Card Name.
Search By Date
To search for a transaction by date, leave the keyword box blank, pick a date and click search
Additional Search Fields
Additional search fields include Amount, and Card Number (First 6 Digits or Last 4 Digits). These can be useful for finding Chargebacks
Export Search Results
You can export the search results into a CSV file using the Export The Current Transaction icon ![]() .
.
How do I set up scheduled or recurring transactions?
Recurring Transactions can be set up within the Transaction Reporting | Transaction History section.
To perform a scheduled transaction, you need to make a one-off transaction first and then schedule the payment after the first payment has been taken.
Running A Scheduled Transaction - Using the menu bar across the top of the page, select Transaction Reporting and then click Transaction History from the drop-down box. Click the transaction you want to work with.
Click the ![]() Set-Up A Scheduled Transaction icon on the toolbar at the top of the page. This will open a page that looks like the following.
Set-Up A Scheduled Transaction icon on the toolbar at the top of the page. This will open a page that looks like the following.
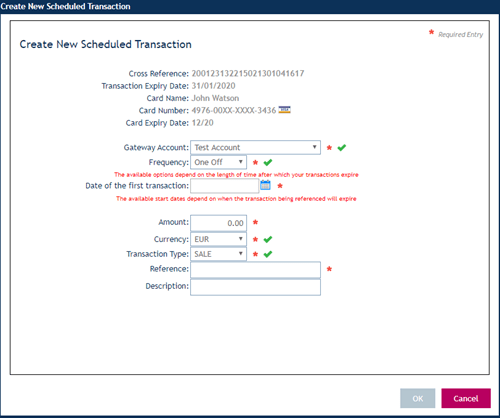
Frequency - Firstly you need to select the frequency of the scheduled transaction.
Date - Next, click on the calendar icon next to the 'Date Of First Transaction' and pick a date you wish the transaction to start from. Once the start date has been selected, select the date you would like the schedule to expire.
Amount, Currency, Transaction Type, and Reference – You can set the amount, currency, transaction type, and reference. You can also add a description.
Complete Scheduled Transaction - Once complete click the 'Create Scheduled Transaction' button. You should then see a green confirmation box that indicates the scheduled transaction has been successfully created.
How do I invoice my customers by sending them a link?
The PayByLink functionality allows you to invoice your customer by sending them a link to a secure payment page via email. This can be found in the Payments section by clicking on PayByLink Administration.
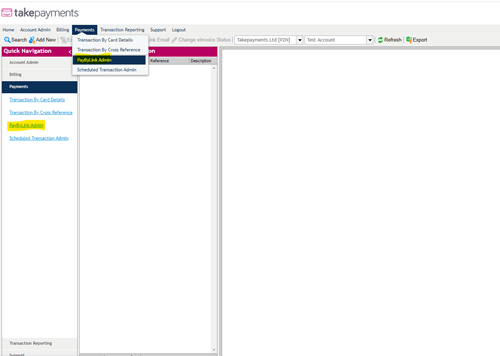
To create a PayByLink, click Add New (insert icon) from the row of icons available on the toolbar. This will take you to the transaction details page where you will need to select a PayByLink Type.
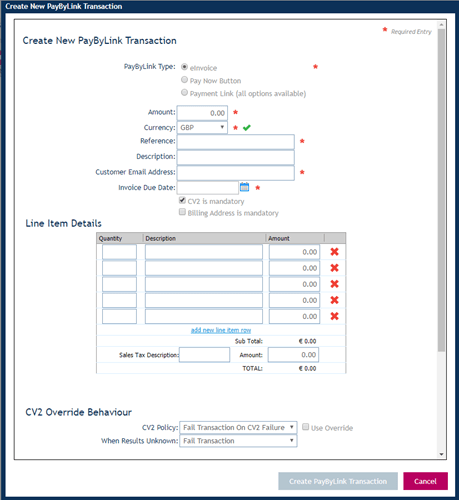
There are three types of PayByLink options:
einvoice - This will allow you to invoice your customer using your own customer template email. You can set a payment due date which will prompt the system to generate an email reminder. Once an invoice has been raised you can track and control the invoice status and also track any actions performed.
Pay Now Button - This will allow multiple customers to make a payment using a single Pay Now button which can be embedded on your website. The Pay Now button can be custom designed to appear as you desire.
General (all options available) - This is a combination of the above PayByLink types which would suit a merchant who wishes to use the full PayByLink functionality.
Trending articles
Can't find what you need?
Our dedicated Customer Support Team are on hand 7 days a week to answer any questions you have. You can call, email or connect via Live Chat.